Saturday 6th August
Started off the day by clearing out as much as possible from the cinema room and then vacuuming the floor – it is amazing how quickly dust builds up.
Not having any covering on the floor does not help as walking around on the screed itself can generate dust – I could seal it, but since we are nearly finished now, and carpet will be going down in a week or two, I don’t really see the point.
I then set about applying the first coat of gloss paint to the skirting and architrave – three hours later the first coat was complete and I needed to wait 16 hours before applying the second coat.
I then decided to put in the lights in the utility room ceiling – marked out all of the locations, drilled the holes and went searching for the cable I had left up there.
Cable found, it was time to fit the down-lighters – three of the four went in ok, the fourth one was the wrong colour, brushed steel instead of white!
Off to Selco to have it replaced – only problem was that they were out of stock of white, so I will need to wait until Wednesday for new stock to arrive.
Sunday 7th August
Decided to start fitting the dado trunking for the sockets, this involved fitting a 3m piece of the base trunking followed by a 1.2m piece to span the wall.
I also needed to cut a slot in the bottom edge as well as drill a hole in one of the horizontal parts to allow the power cable to enter, I also fitted a 22mm grommet to the hole to prevent abrasion.

Next task was to cut the upper and lower angled trunking parts allowing for the joint coupler cover piece and end cap.
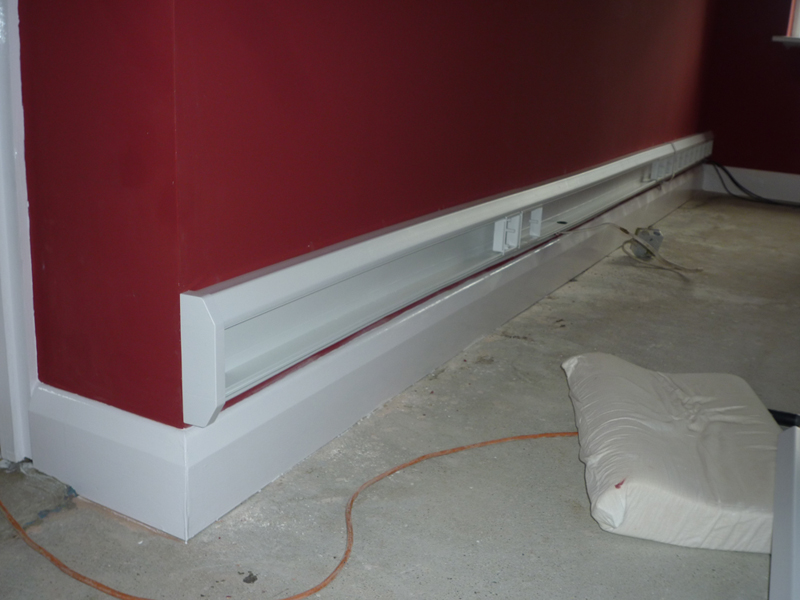
I intend to have around 10 2 gang sockets at the right hand end of the wall – hence the reason for the trunking, I did not want to cut out half the wall for sockets.
This way, should I ever sell the house, I can reduce the number of sockets and simply fit a longer length of the main compartment cover for the trunking.
Fitting the mounting boxes for the sockets right next to each other requires a 10mm strip of the main compartment cover in order to fill the gap, a 15mm piece was required either side of the coupler
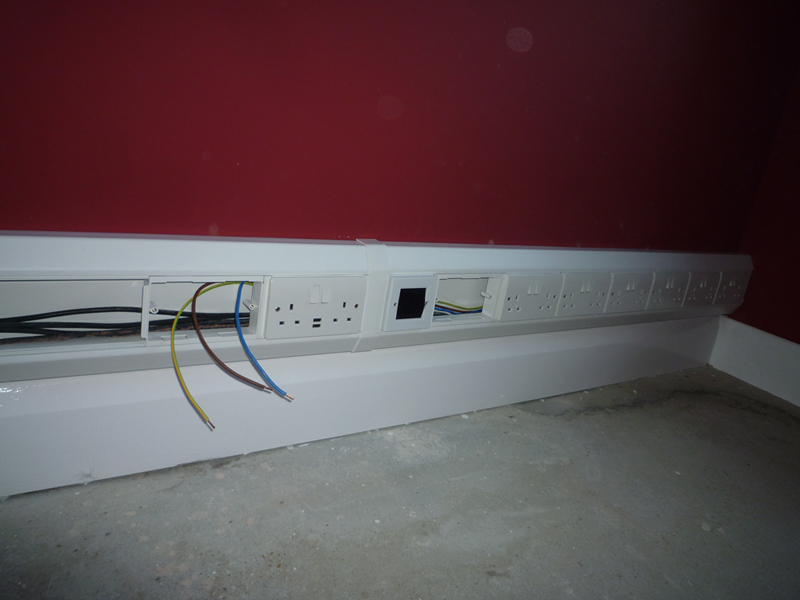
I decided to apply the second coat of gloss paint next, as I could wire up the sockets whilst the paint was drying – the second coat was a bit quicker and only took 2 hours to apply.

I fitted 6 x 2 gang sockets at the right hand end, the next 2 gang hole is for modular satellite fittings, I need to obtain a 2 gang frame, as I currently only have 1 gang frames, I also need another single F-Type outlet.
Another benefit of using trunking is that I don’t need to use twin and earth cable, but can use individual lengths of each cable
The brushed outlet is for the motor cable for my motorised dish, it will also be used to run the HDMI cable and RF cables to the TV, coming out at a second brushed outlet beneath the TV itself.
I also fitted a 2 gang + USB outlet in case to save having to use a socket for a USB transformer.
I ran out of sockets at this point, mainly because I need to swap some of the other sockets in the house to 2 gang + USB outlets to free up a number of normal 2 gang outlets.
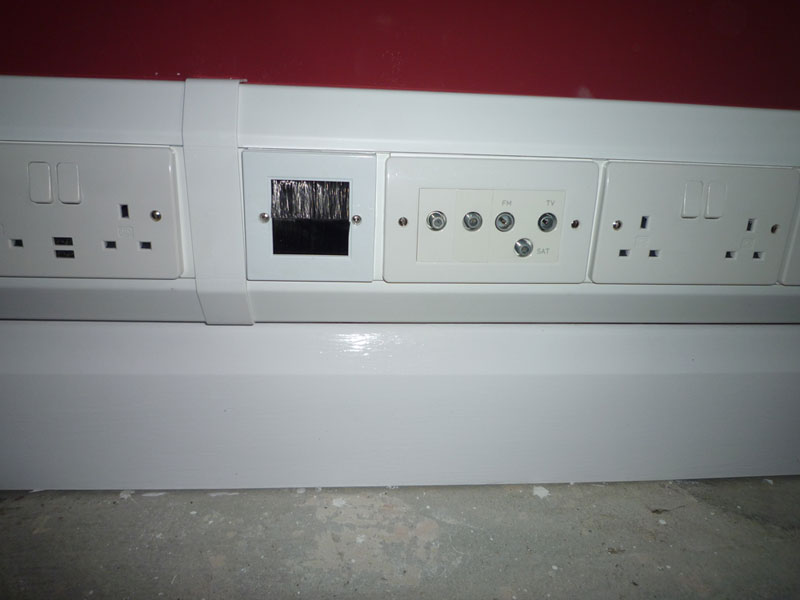
The satellite cables are only run in the middle section of the trunking in the above photo to keep them out of the way.
The satellite cables move from the bottom compartment to the middle compartment by the empty 2 gang opening and brushed outlets.
Likewise the live power inlet is currently just held behind another mounting box and brushed outlet near where the TV will be located.
Tuesday 9th August
The 2 gang frame and the second F-Type outlet arrived today, so I decided to wire up the satellite outlet plate.
Wednesday 10th August
