Some of the technologies that will be used on this installation:
![]()

![]()

![]()
![]()
![]()

Kubernetes or K8s (K ‘8 letters’ S – pronounced ‘cates’) is a container orchestration system that automates the deployment, scaling and management of containerised applications
K3s (K ‘3 letters’ S) is a lightweight version of Kubernetes designed for IoT and Edge Computing platforms
Cluster #1 – Proxmox
Proxmox Virtual Environment is a virtualisation platform for hosting virtual machines, much like having your own private cloud solution.
Having built the physical servers, it was now time to install the operating systems and guest virtual machines.
The initial install involved a little BIOS configuration, a BIOS update, reset the vPro management utility and then PXE booting off my NetBootXYZ Docker container to enable me to install Proxmox VE on the 64GB SATA NVMe drive on each node
With the base operating system installed I then updated the network configuration – the default is to have a network bridge configured on the primary interface, however I wanted the primary 1Gb interface to be purely for Proxmox cluster and management traffic, and then use a bridge on one of the 10GB interfaces for the various outward facing Virtual Machines.
Once the network interfaces had been configured, I joined the servers into a Proxmox cluster.
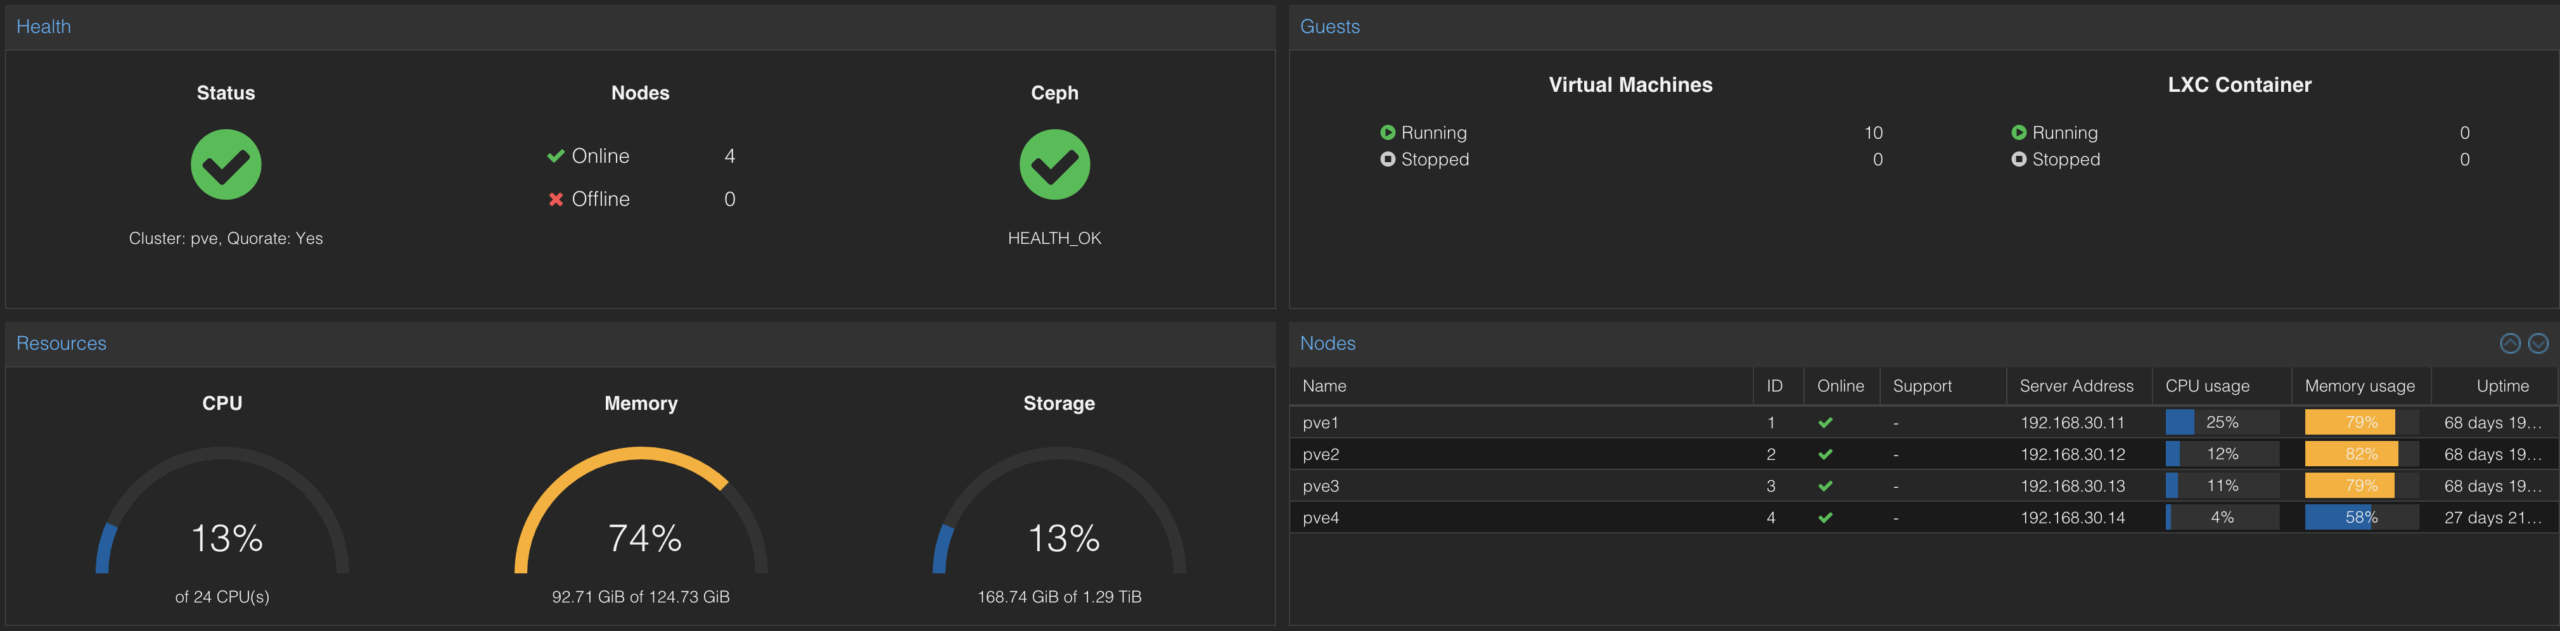
Current load on the Proxmox cluster:
Cluster #2 – Ceph
Ceph is a unified storage solution, providing object, block and file interfaces from a single cluster.
I then installed Ceph on each node and configured a Ceph cluster with a private network on the 10GB interface, once I have some more cables, I will probably move this to a dedicated 10GB interface to keep it separate from the Virtual Machine data.
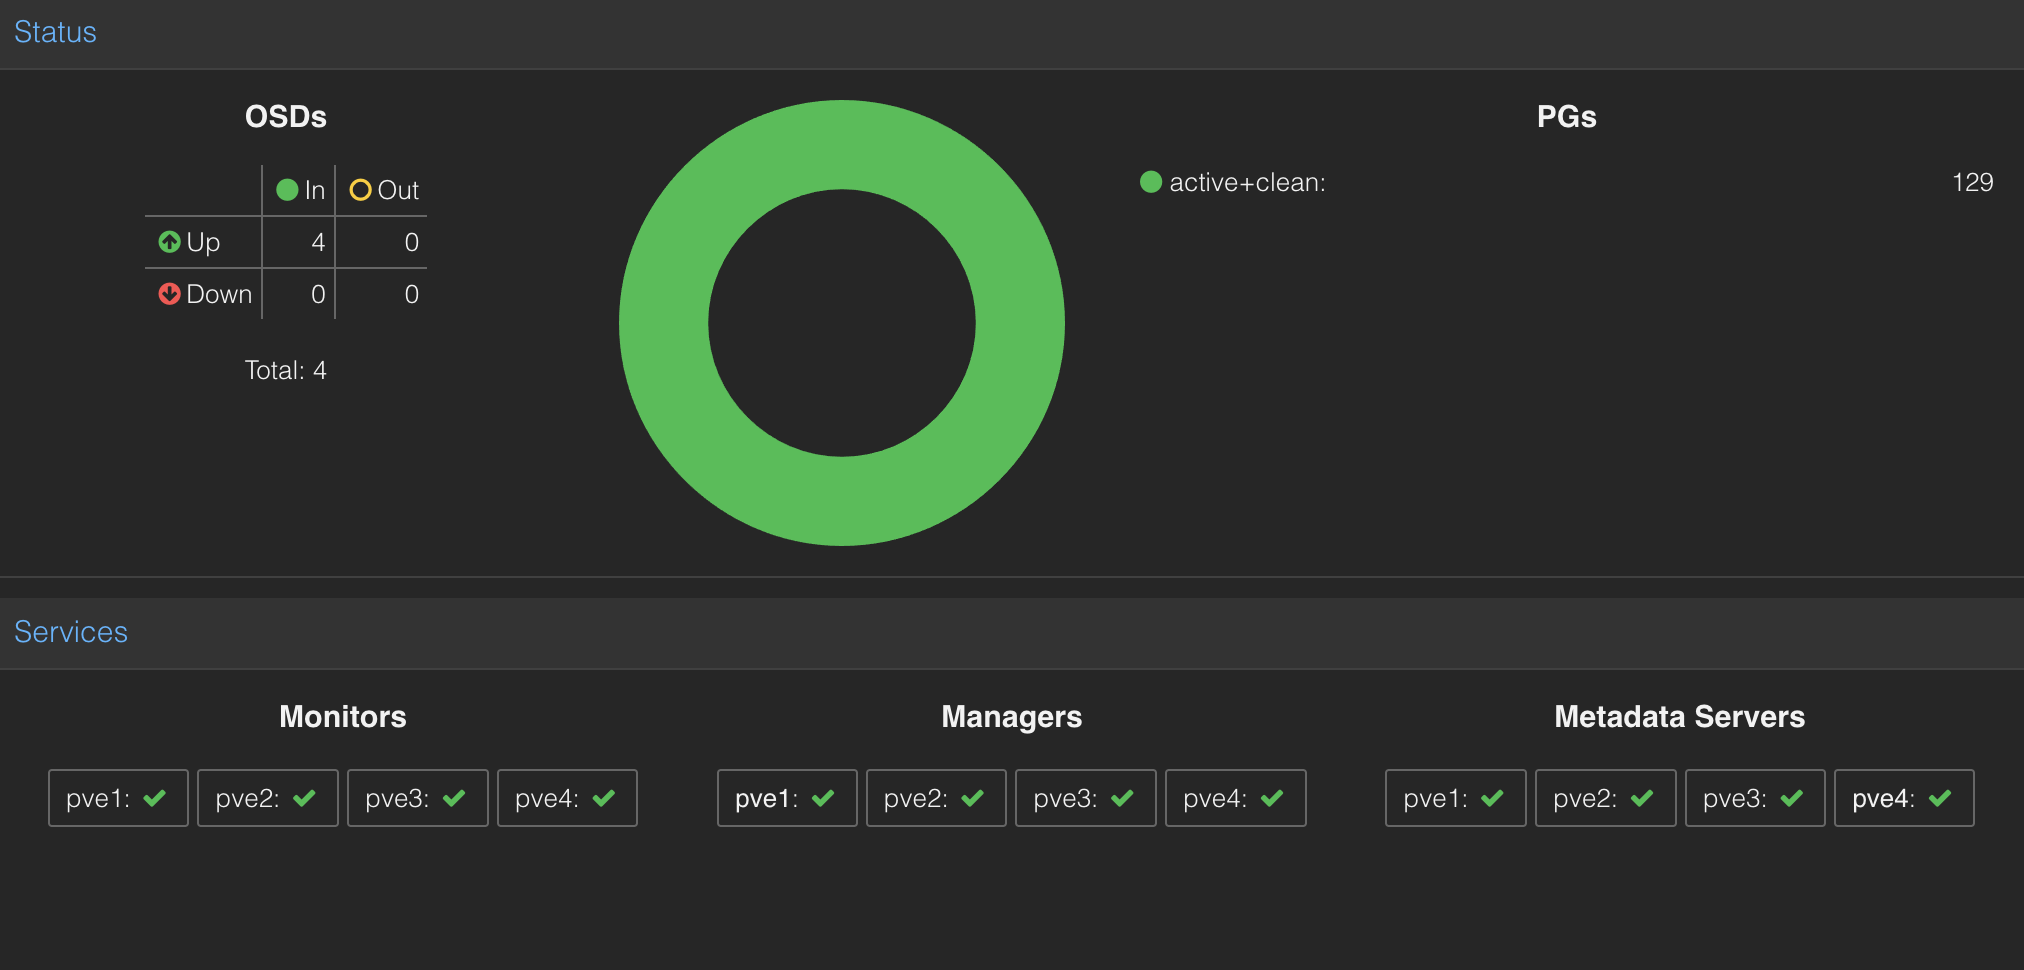
Having installed Ceph, I created a Manager, Monitor and MetaData service on each node as well as configuring an OSD for the 1TB NVMe drive on each node, this gave me 1.29TiB of replicated storage across the 4 nodes
I then created a Ceph Pool that I could use for backend storage for the Virtual Machines I was about to build.
Infrastructure as code
The next part of the setup involved installing Terraform on my iMac then setting up an API key and user within Proxmox that Terraform could interact with along with some provider and node configuration details.
The first step was to make the build image available on each of the nodes, for this I chose to download the ‘Noble Numbat’ (Ubuntu 24.04 LTS) cloud image to each Proxmox cluster node.
I could then start creating the configuration for my Rancher and K3s Kubernetes clusters.
I opted to use the bpg/Proxmox Terraform provider to create my virtual machines along with the integrations/github provider to install my ssh keys from GitHub.
I knew it was going to take a few goes to perfect the various Kubernetes installations, this way I could stand up and tear down the entire environment in a matter of minutes – the 7 node Kubernetes cluster only takes just over 2 minutes to create the virtual machines and about 30 seconds to tear them all down again ready for the next run.
Cluster #3 – Rancher
Rancher is a platform for managing and deploying Kubernetes clusters, it lives in its own minimal Kubernetes cluster.
My previous Rancher installation was a Docker container running a single node instance of Rancher, which, whilst it worked well for managing my last Kubernetes cluster, I wanted something a bit more resilient for this time around.
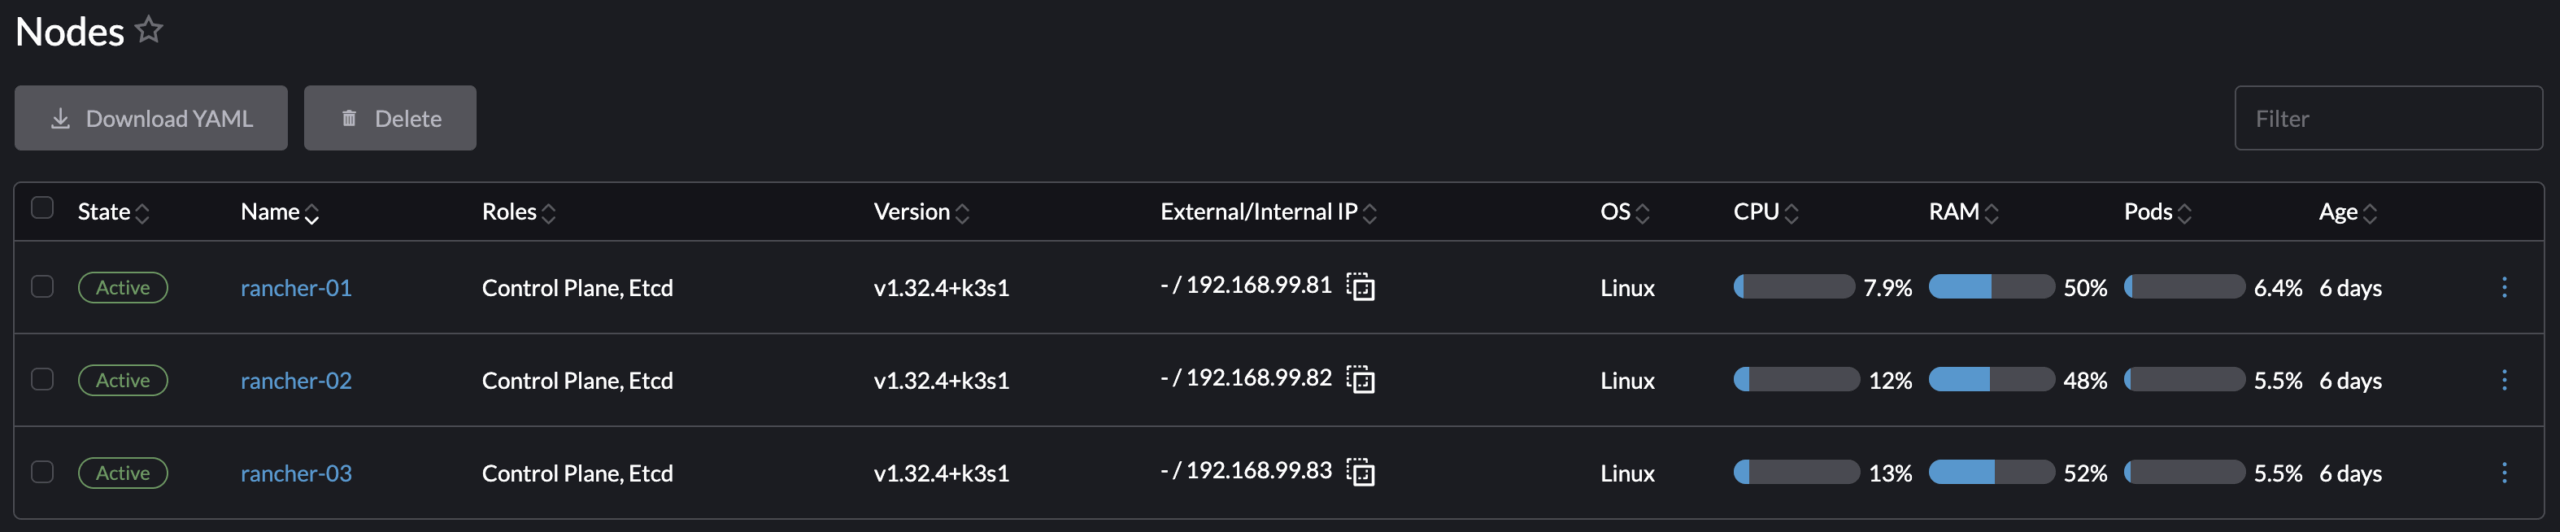
The Rancher cluster is 3 servers, each with 2 cores 4GB or memory and 32GB of disk (supplied from the Ceph pool), one assigned to each of the first 3 Proxmox cluster nodes
With the base OS installed, the next step was installing K3s via k3sup (pronounced ketchup), one initial server, then two additional servers
The latest version of k3sup has a ‘plan’ option which if supplied with a json file containing host names and IP addresses will create a ‘bootstrap’ script to install K3s on all of the nodes
k3sup plan \
devices.json \
--user ubuntu \
--servers 3 \
--server-k3s-extra-args "--disable servicelb" \
--background > bootstrap.sh
After running the bootstrap script, it is then a matter of providing the minimal cluster configuration required to setup Rancher
Configure Kube VIP (virtual cluster IP and load balancer), Install Cert-Manager via Helm, install Rancher via Helm and finally expose the Rancher deployment via the Kube VIP load balancer.
I have yet to script the configuration post K3s cluster creation, but I have all of the steps saved for when I decide on the best automation technology to use
Rancher cluster nodes as seen from the Rancher dashboard:
Cluster #4 – Kubernetes
The K3s Kubernetes cluster is made up of 7 servers – 3 control nodes, each with 2 cores, 4GB or memory and 32GB of disk (supplied from the Ceph pool) and 4 worker nodes, each with 4 cores 16GB or memory and 32GB of disk (supplied from the Ceph pool)
For the control nodes, one assigned to each of the first 3 Proxmox cluster nodes, for the worker nodes, one is assigned to each of the 4 Proxmox cluster nodes.
K3s was once again installed via k3sup, one initial server, two additional servers, then the four worker servers
The rest of the initial configuration was very similar to the Rancher cluster: configure Kube VIP, install Cert-Manager via Helm, install Traefik ingress manager via Helm, then import it on the Rancher Cluster for easier management.
I then also installed Prometheus/Grafana via Helm, from Rancher for monitoring
Next I needed to setup the various Ceph storage classes, one for CephFS and one for Ceph RBD via the Ceph CSI driver, this required some setup on the Proxmox cluster in order for the Ceph CSI driver to be able to talk to the Ceph cluster to provision storage as required.
I then needed to create a couple of Cluster Issuers for Cert-Manager so it could request and manage LetsEncrypt site certificates for the various websites that the cluster will be hosting
Traefik also required some additional configuration to expose and secure the dashboard as well as setup a bunch of re-write middleware rules to ensure all inbound traffic uses the encrypted ‘https’ route to these websites.
The post K3s cluster configuration is again still manual at this point but again I have all of the steps saved for future automation.
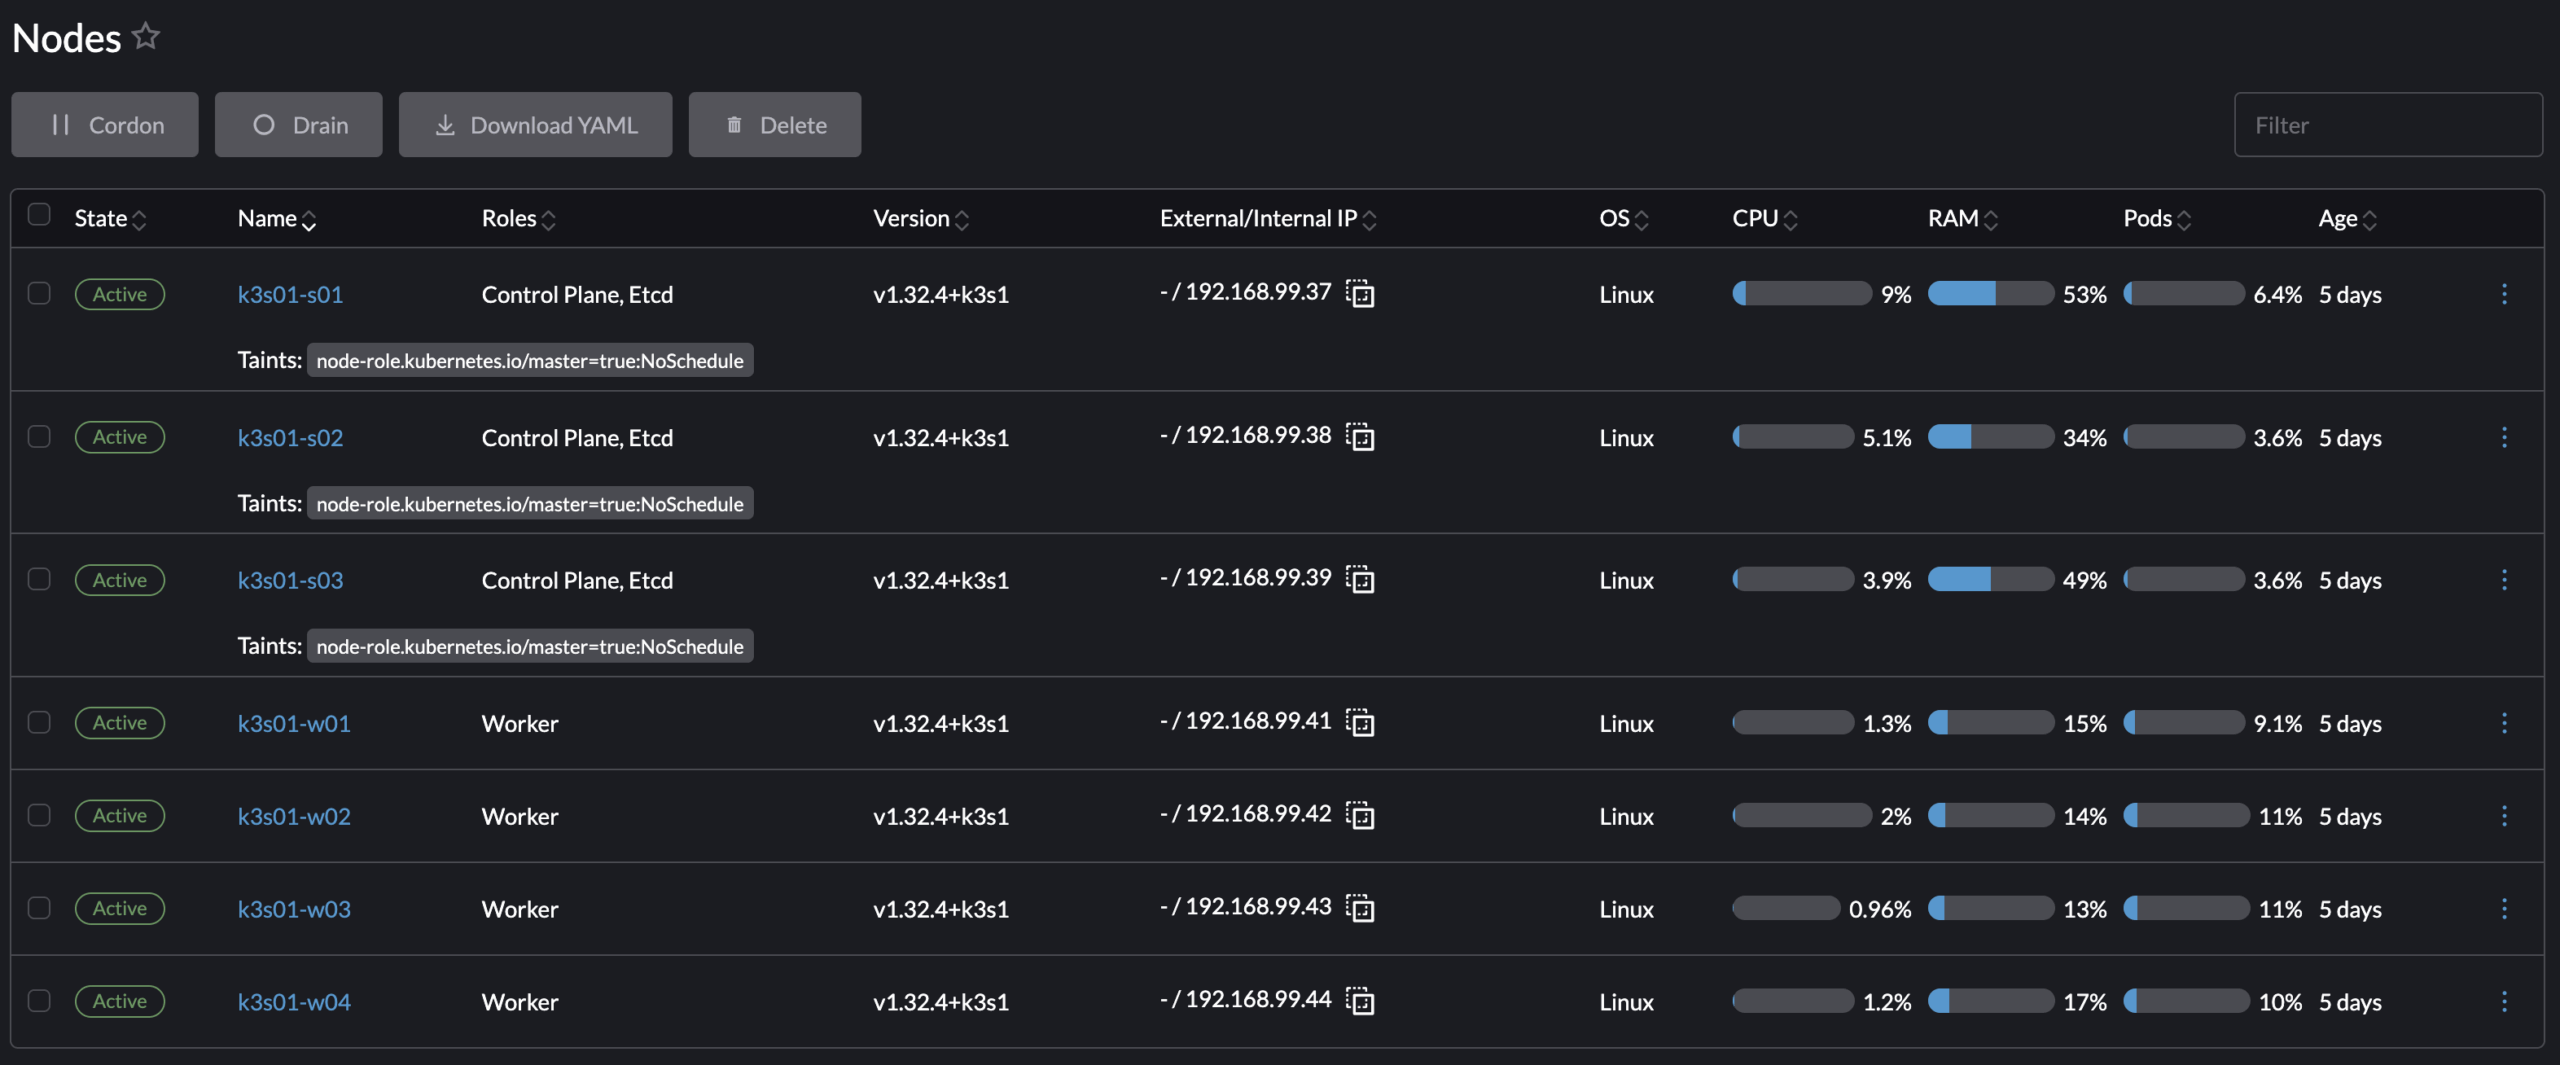
K3s cluster nodes as seen from the Rancher dashboard:
Application Deployments
Each application lives in its own Kubernetes namespace for isolation purposes and is made up of a bunch of yaml files which are all deployed at once using the kustomize aspect of kubectl, the command line interface for Kubernetes.
A typical Website install consists of the following:
- namespace.yaml – creates the namespace
- secret.txt – MySQL root password
- service.yaml – Service exposing the database port (3306)
- pvc.yaml – Storage Persistent Volume Claim (Ceph RBD)
- deployment.yaml – MySQL Docker configuration
- kustomization.yaml – how to deploy the entire set of configuration files
- certificate.yaml – request for a LetsEncrypt site certificate
- ingressroute.yaml – detail on how to access the application from the outside via Traefik
- redirect-https.yaml – Traefik middleware redirect for http to https
- redirect-admin.yaml – Traefik middleware redirect for the WordPress admin pages (more on this later)
- secret.txt – WordPress user name and password
- service.yaml – service exposing the website port (80)
- pvc.yaml – Storage Persistent Volume Claim (CephFS)
- deployment.yaml – WordPress Docker configuration
- kustomization.yaml – how to deploy the entire set of configuration files
The namespace is created first, then the MySQL deployment is run, once that is up and running I log into the MySQL pod and create the database, set the user password and grant privileges:
create database <db name>;
create user `<db user>`@`%` identified by '<password>';
GRANT ALL PRIVILEGES ON `<db name>`.* TO `<db user>`@`%`;
I then run the WordPress deployment and connect to the website’s URL, set the website user and password and complete the WordPress install.
I use the above process regardless of creating a new website or recovering an existing one, all of my websites are backed up via Updraft Plus to S3 buckets on my MinIO Docker instance that lives on my media server
Restoration is simply a matter of installing the Updraft Plus WordPress plugin, setting the S3 configuration for the website, scanning the remote storage for backups and then restoring from the latest one.
The whole process from creating the namespace to starting the restore only takes a couple of minutes.
I use my own cloned version of WordPress that allows me to upgrade it properly, for full details, have a read of the following: Adrian Goins – How to install WordPress ‘the right way’ this separates the WordPress configuration from the actual version specific content.
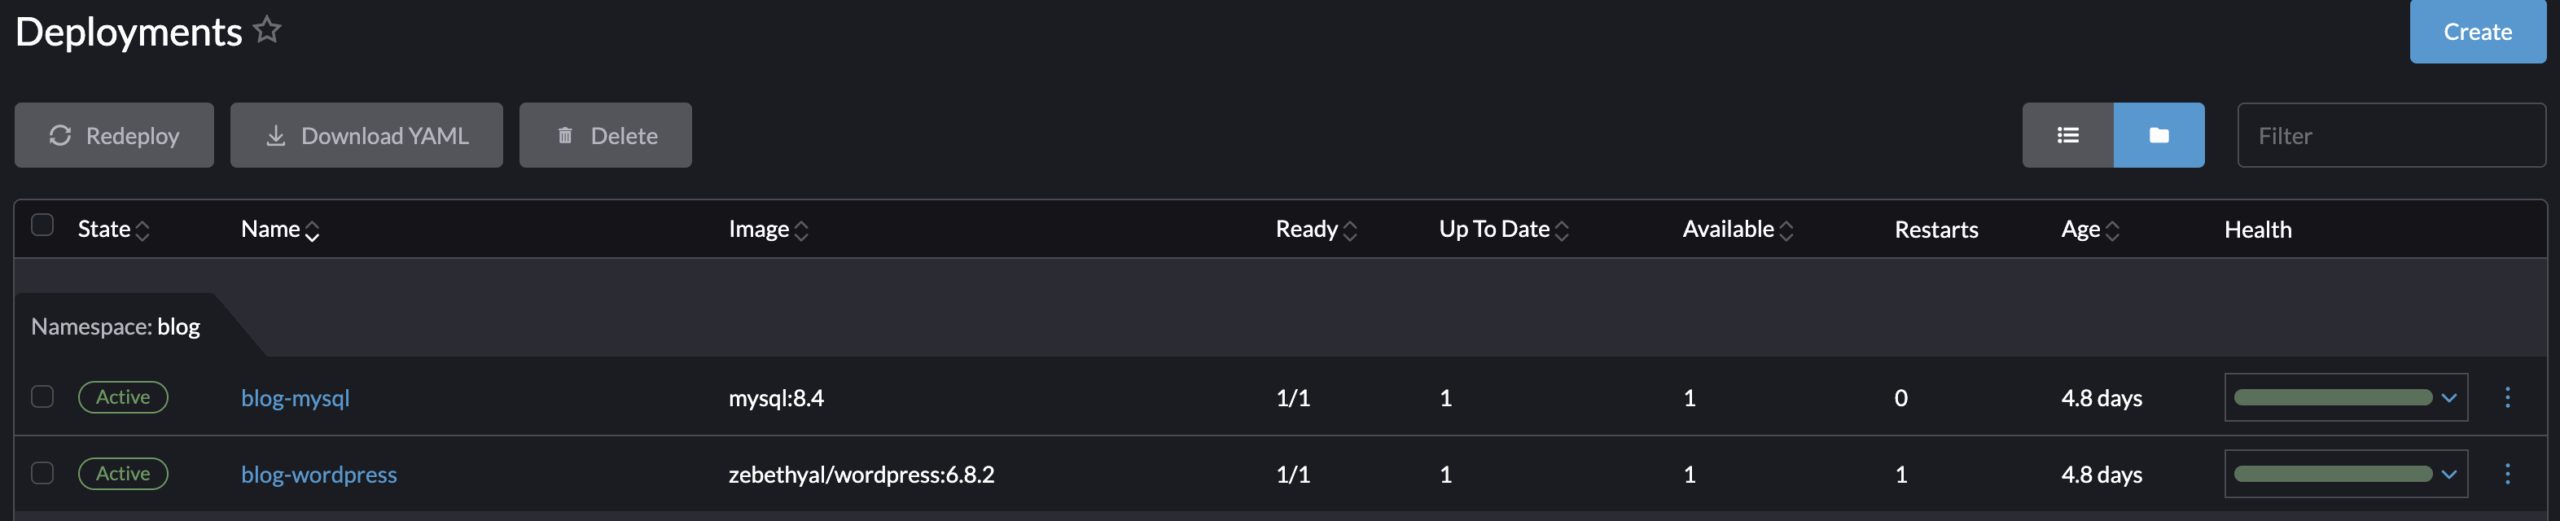
Typical deployment (this website) as seen from the Rancher dashboard:
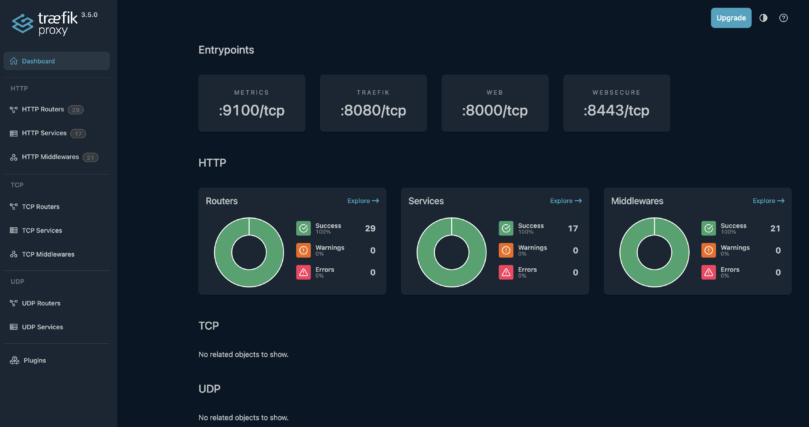
 Traefik proxy dashboard:
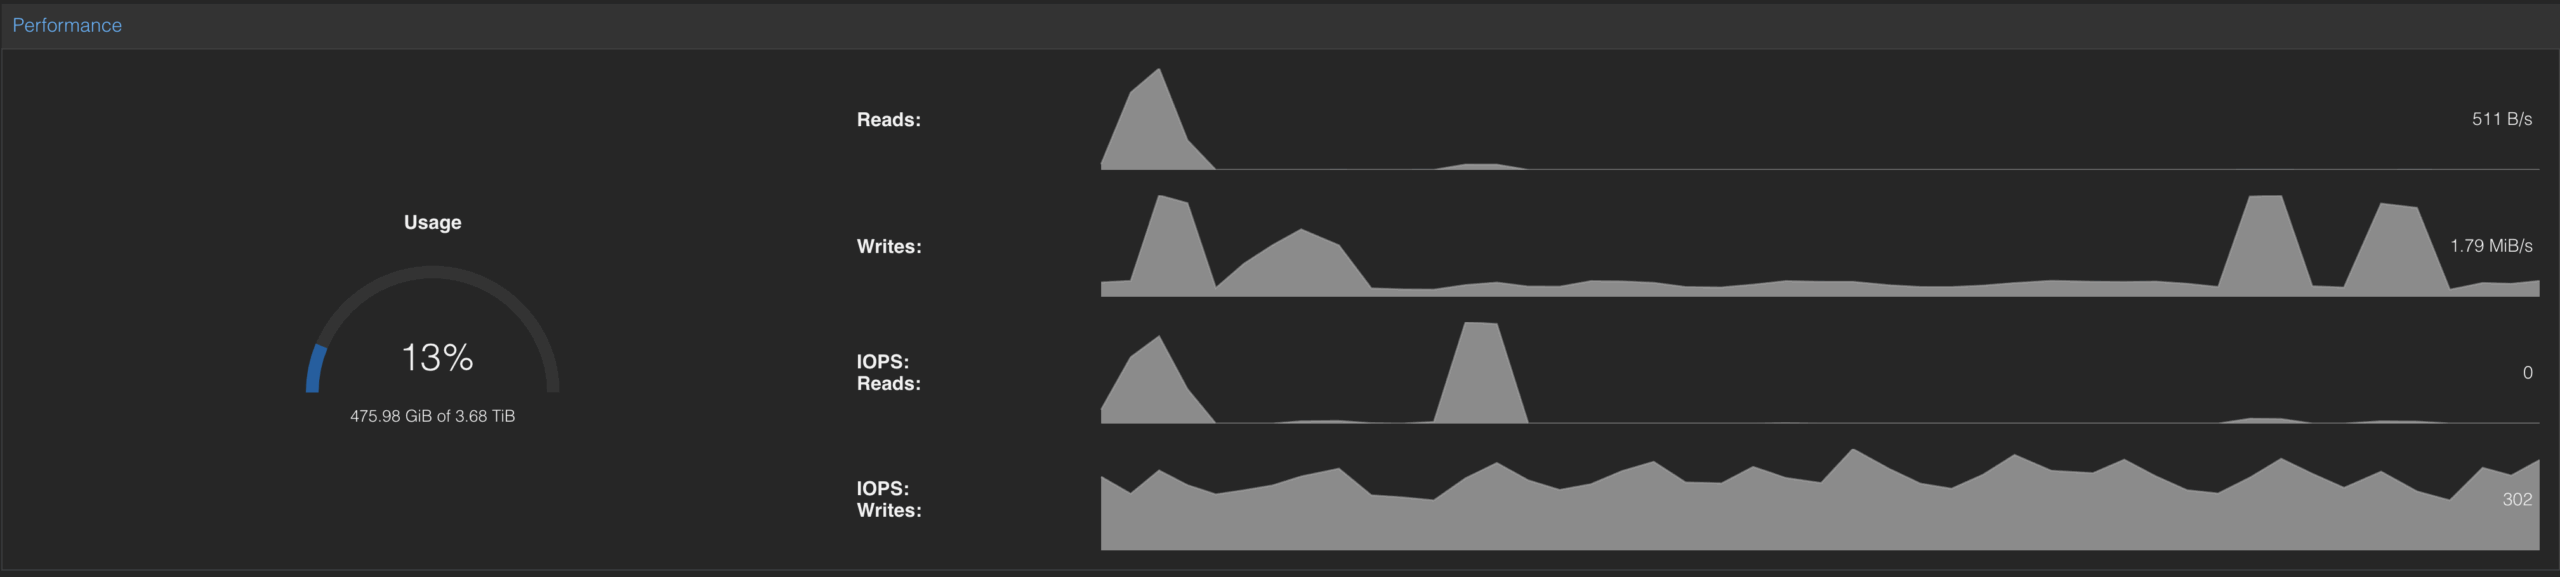
 Ceph storage performance:
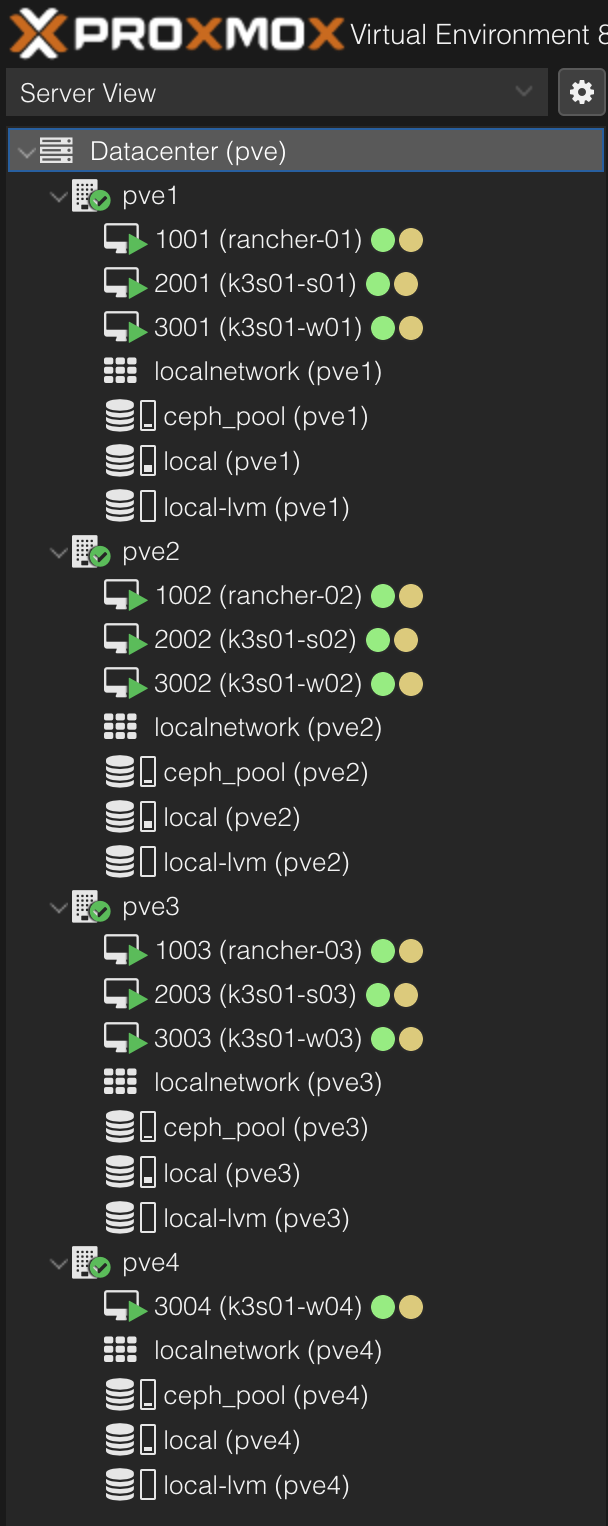
Proxmox nodes and associated virtual machines:
 I have since bought the parts for two more nodes which I will use to increase the various clusters and spread the load out a bit more evenly.
I still intend to move my Unifi controller and Pterodactyl/Wings virtual machines from my Dell R220 ii server onto the Proxmox cluster as well, but I want to rearrange my office rack a bit first.