
I bought a V911 Helicopter second hand from ebay, (£8.87 + £5.00 P&P) that according to the seller only flies around in circles, so may need a new board. I can buy a new board for about £6.00, so this is still a bargain – the remote alone sells for £10.00 and the V911, bind and fly, for around £13.00.

I mainly wanted the remote so that I could remove the A7105 module to add to the CC2500 module I won on ebay (£2.37 + £2.38 P&P) to upgrade my Devo 8 Transmitter that I previously re-flashed with the deviationtx firmware.
The addition of the A7105 module allows me to use the Devo 8 to control Turnigy/Flysky, WLToys, Xieda and Hubsan4 protocols.
The addition of the CC2500 module allows me to control Skyartec, Frsky1 and Frsky2 protocols (although the firnware update for the Frsky ones is still being developed at the moment).
The steps required are all covered in the Module Installation document from deviationtx, I did have to make a few small changes as my CC2500 module is not the same as the one shown in the document, it has a built-in aerial and a different pinout. The datasheet however explains the pinouts and the adjustments were simple enough to make.
I thought I would just check the V911 and transmitter and receiver to ensure they could actually communicate before I ‘butchered’ the transmitter.
First issue was that the transmitter would not even power on, with brand new batteries installed! I checked the battery compartment with a volt meter and discovered that at least 2 or 3 of the AA cells were not actually making contact at the positive end.
I resolved this with a few pieces of folded up tinfoil, after which the transmitter powered up without issue, bound with the V911 and all controls seemed to be working as expected.
Removal of the A7105 module was a pretty straightforward desoldering job, first I removed the module from the main circuit board, then I removed the individual pins from the module.
In order to make soldering the wires to the module easier, I drilled out the solder covering the holes where the pins had been with a 0.7mm drill, from my set of carburetor jet drills.

Here are the two modules ready for installation.
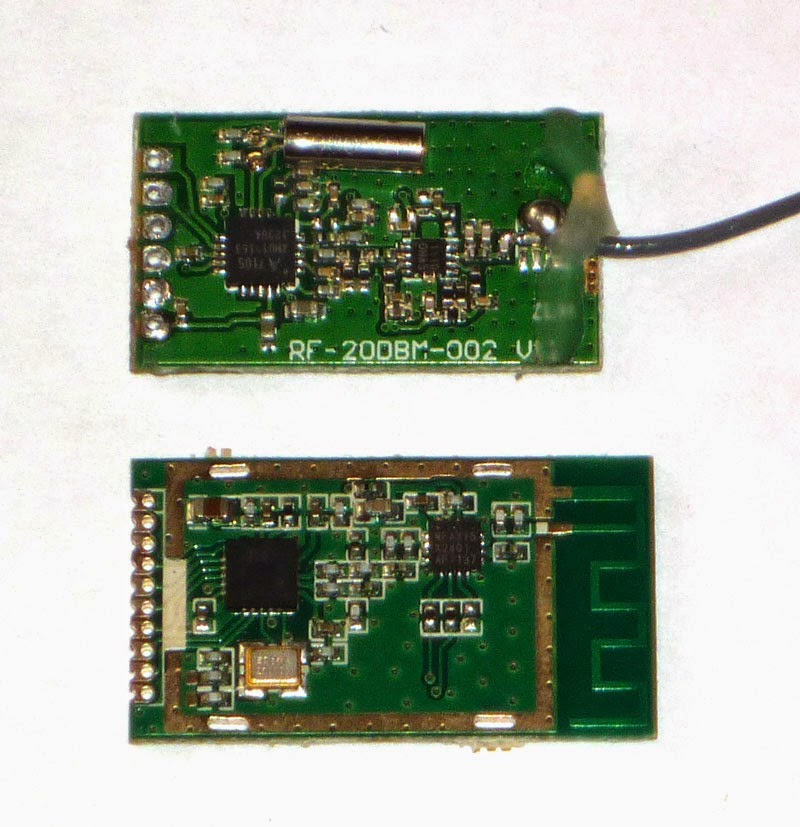
And from the rear.

The modules are connected to a combination for the debug port and also the existing CYRF6936 module.

For the wiring I used 30 AWG Kynar 30awg wrapping wire.
I had a few issues persuading the solder to adhere to the CC2500 module pads, along with the fact that the pins were on a 1.27mm (0.05″) spacing rather than the 0.1″ (2.54mm) spacing on the other two modules.
Eventually I decided to pre-tin the pads using a smaller tip on the iron at a slightly higher temperature and then drill them out with a 0.60mm drill. After this, the soldering went smoothly.
All wired up and ready for testing.

Initially I left out the ground wire between the CYRF6936 module and the CC2500 module, but thought it best to supply all the wiring mentioned in the Module Installation document.
I then made the relevant changes to the tx.ini file on the Devo 8, as mentioned at the end of the Module Installation document, whilst connected via a USB cable and uploaded the model information for a V911 which I found on the deviationtx forum.
I am happy to report that it bound successfully with the V911 and all the controls are working as expected.